Process Checking Report
Process Checking Report
By mapping pre-processing elements and time/unit elements to post processing elements the process checking report compares the corresponding values listing the numeric and percentage variance. The report configuration allows for setting variance parameters to highlight differences with amber and red cell colour.
The report allows for the combining of multiple period and permanent pre-processing elements to one post processing element. For example, where an employee could receive a monthly bonus and an annual bonus and these are combined in the gross to net report as one element called bonus, the system will aggregate the pre-processing values.
Where a single pay element has both period and permanent, the system will combine the values for a given employee.
Time/Unit elements are also mapped to post processing elements, where the element has a value the report will show the numeric difference and the percentage difference. Where an element has a unit value, the report will calculate the rate based on the post processing value divided by the number of units.
The objective of the process checking report is to ensure the correct values have been processed and nothing has been added. On upload of a gross to net report, new pay elements can be added to a payroll. The process checking report has a dependency on every post processing element being assigned to a pay element group or to have no group. If a new pay element has been created it will be unhandled, i.e. it does not have a pay element group / no group, the system will not allow the report to run until the pay element has been assigned. This provides a safeguard to prevent fraud or the incorrect loading of gross to net data.
Pre-processing and time/unit mappings
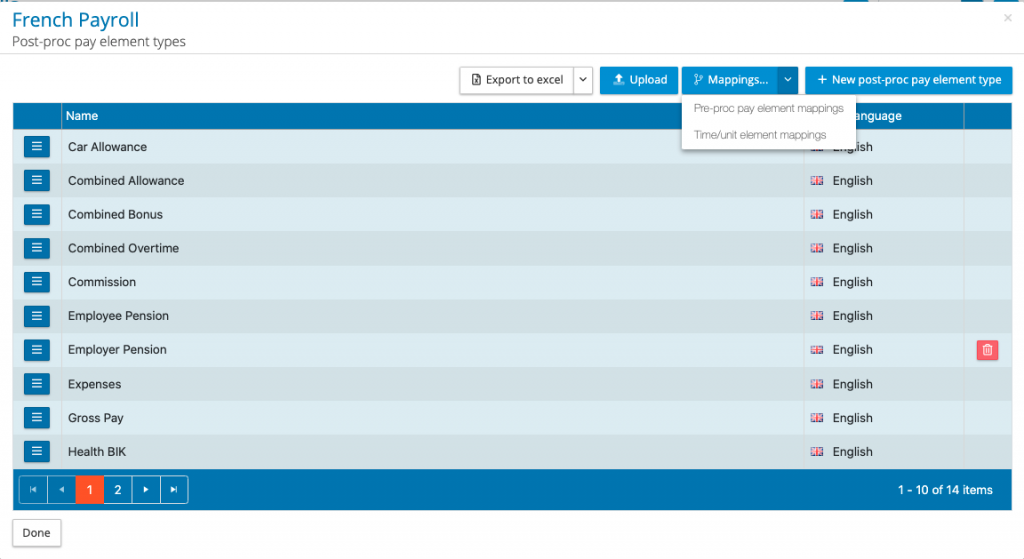
From the payroll menu, using the action button next to the payroll, go to Pay data > Pay element types > Post-processing.
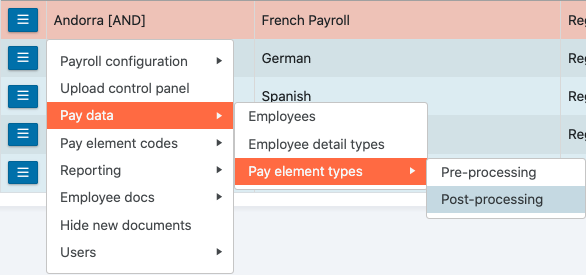
From the post-processing element types it is possible to map pre-processing and time/unit elements using the mapping function. From the dop down mapping menu select either pre-proc element mappings or Time/unit element mappings.
Pre-processing mappings
In the pre-processing mappings, a number of methods have been provided to speed up the mapping process.
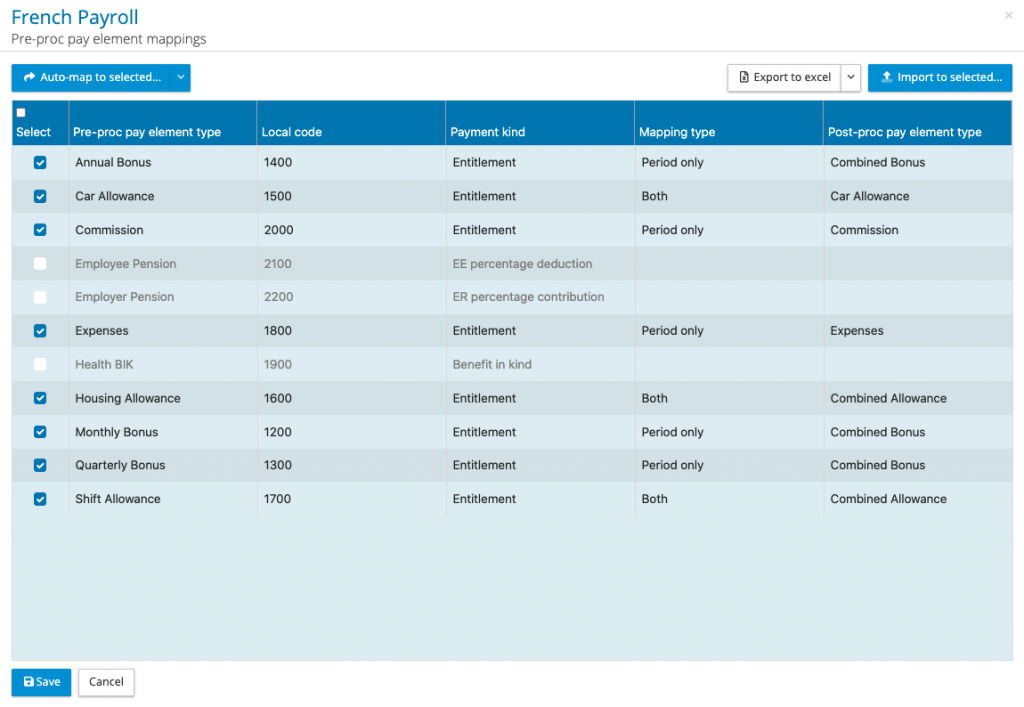
The first action is to select the pre-processing elements that you wish to map, simply check the box next to the element, or select all (check box on the menu bar) and uncheck those that are not needed.
When mapping a pre-processing element to a post process element the mapping type must be selected. A specific pay element can be used in the system to hold period values and permanent values. The mapping type options are as follows:
Period only – The report will take the period pay element value for a given employee and compare that to the post processing element value.
Permanent only – The report will take the permanent pay element value that is effective for the pay date of that pay period. Provided the effective from data is before the pay date and the effective end date is on or after the pay date, the system will take that permanent pay element value to compare it with the post processing value.
Both – The report will take the period and permanent pay element value for an employee, summating the two components and comparing it with the post processing value.
Three ways in which to create the mappings:
Option one – Auto-map – The auto-map function will look for a post processing element name that is identical to the pre-processing element name and will map it. You must choose the mapping type, either period only, permanent only or both, for those pre-processing elements selected will populate the matched mappings. If you have chosen period only, and one element is permanent only, this can be changed on the screen.
Option two – Import – It is possible to create an upload template format export allow for the mapping of pre-processing elements to mapping type and post processing elements in Excel, and then uploading to the mapping table. Please ensure the pre-processing elements have been selected prior to this process.
Option three – On-screen – Through the user interface select the mapping type and post-processing element for each of the pre-processing elements. NOTE: Multiple pre-processing elements can be mapped to a single post processing element, the report will summate all the pre-processing values and compare this to the post processing value.
When all of the mappings are complete press the save button.
Time/unit element mappings
The mapping process is similar to the pre-processing mapping with the exclusion of mapping type. All time/unit element values are period only. The report will summate all of the values held against an employee for a given pay period for a specific time/unit element.
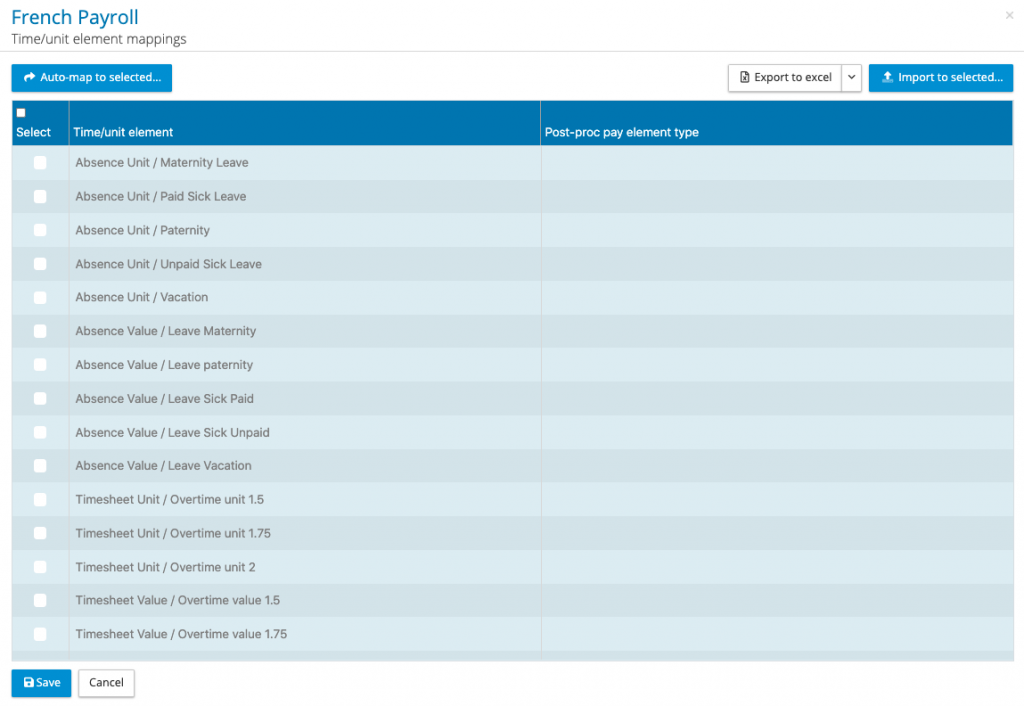
- Unit and value-based time/unit elements can be mapped to a post-processing element.
- A multiple unit and value-based time unit elements can be mapped to a single post processing element.
- The report will compare the value items first and create a unit rate from the balance (post processing value less time/unit value divided by the number of units).
Creating Process Checking Configuration
To run a process checking report, a configuration has to be created. From the payroll menu using the action button against the payroll, select reports > configurations > process checking report. Select a new report or edit an existing report.
On the default tab enter the report title, under settings select the following:
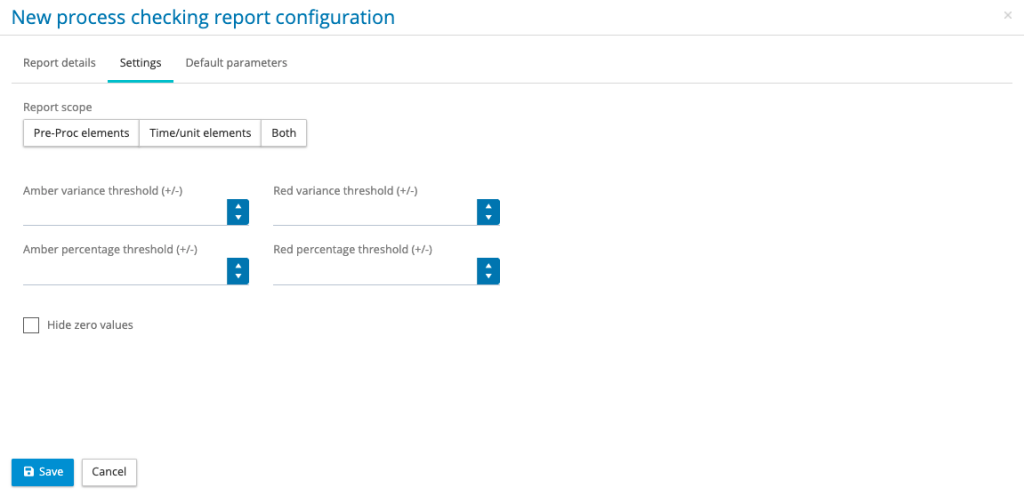
Report scope – Select pre-proc elements, time/unit elements or both. When both has been selected the pre-processing elements and time/unit elements will be on separate tabs in the spreadsheet.
Thresholds – To assist a user to focus on the potential issues, the report configuration can have thresholds for colouring the excel cells based on difference of the value or percentage. Specify the threshold for amber and red cell thresholds.
Hide Zero Values – Where the pre-processing or time/unit value is zero/null and the post processing value is zero/null, the line item will be removed from the report.
Finally, if the report is going to be included in a reports package on the default parameter tab select the default language.
Running a process checking report
From the payroll menu using the action button next to the payroll select reports > process checking report. Select the report configuration and pay period and click on generate report. NOTE: the post processing period has to be locked before pay period will be listed.
The report has a fixed format, for the pre-processing report the column headings are as follows:
Employee number
Local payroll number
First Name
Last name
Payroll Start Date
Payroll Leave Date
Pre-proc element type – this will list the name of the element or it will have [multiple] where there is more than one pay element mapped to the post processing element. Where there are multiple mappings the cell will have a note listing all of the element names that have been mapped to that post processing element.
Local code – This is the local code name for the pre-processing pay element or it will have [multiple] where there is more than one pay element mapped to the post processing element.
Payment kind – This is the payment kind for the pre-processing pay element or it will have [multiple] where there is more than one pay element mapped to the post processing element.
Mapping Type – Period only, period only or both
Pre-processing value – this is the value for the employee, which will be a summation of period and permanent value where both has been selected as the mapping type, and/or a summation of multiple pay elements based on multiple mappings to a single post processing pay element. For permanent pay elements, the report will take the effective value for pay date for a given pay period.
Post-processing value – This is the post processing value for the mapped element.
Value variance – This is the post processing value less the pre-processing value
Value difference – This is the post processing value less the pre-processing value.
Percentage Difference – This is the value variance is value difference divided by the pre-processing value.
Post-processing element type – Name of the post processing pay element.
The report has a fixed format, for the pre-processing report the column headings are as follows:
Employee number
Local payroll number
First Name
Last name
Payroll Start Date
Payroll Leave Date
Time/Unit element – this will list the name of the element or it will have [multiple] where there is more than one time/unit mapped to the post processing element. Where there are multiple mappings the cell will have a note listing all of the element names that have been mapped to that post processing element.
Usage Type – This lists the time/unit type, e.g. value date worked, where there are multiple elements mapped to a post processing element it will have [multiple] inserted in the cell.
Time/unit value – this is the value for the employee, which will be a summation of time/unit values for a time/unit value element or elements where multiple elements have been mapped to a single post processing pay element.
Post-processing value – This is the post processing value for the mapped element.
Value variance – This is the post processing value less the time/unit value
Percentage Difference – This is the value variance divided by the pre-processing value
Value Balance – This is showing the balance after the time/unit value has been subtracted from the post processing value.
Time/unit units – This is the summation of the units for each time/unit element assigned to the post processing value, for a given employee.
Unit rate – This is the value balance divided by the units to give a unit rate.
Post-processing element type – Name of the post processing pay element.
Reports Package
Process checking reports can be added to a reports package.
Assignment of pay elements to pay element groups
This is a reminder that all post processing pay elements must have been a pay element group or no group. Go to administration > pay element groups to set up the grouping hierarchy. You may have your own approach to grouping or have client specific grouping agreed. Our suggested grouping is as follows
| Group | Sub-group | Payment Type |
| Employee Payments | Salary | ER to EE |
| Salary adjustment | ||
| Allowances | ||
| Bonus/Commission | ||
| ….continue to add other key areas | ||
| Employee Deductions | Tax | EE to Other |
| Social Insurance | ||
| Pension | ||
| ….continue to add other key areas | ||
| Employer Deduction | Social Insurance | ER to Other |
| Pension | ||
| ….continue to add other key areas | ||
| Totals | Gross Pay | Totals |
| Total employee deductions | ||
| Net Pay | ||
| Employer contributions | ||
| Notional Amounts | Healthcare Payment | Notional |
From the payroll menu using the action button next to the payroll go to pay element codes > pay element group assignments. This will list all of the post processing pay elements, assign a sub-group to each pay element or assign NO CODE. When every element has an assignment click on save.