FILES
Navigating to files
There are multiple routes to navigate to the file system. From the main menu click on Files this will open the file system at the top folders for each four areas. From the dashboard using the fast path in the heading for each payroll, opens the file system for that payroll and pay period. From the employee data list opens the file system for that specific employee. From the task menu a File action button.
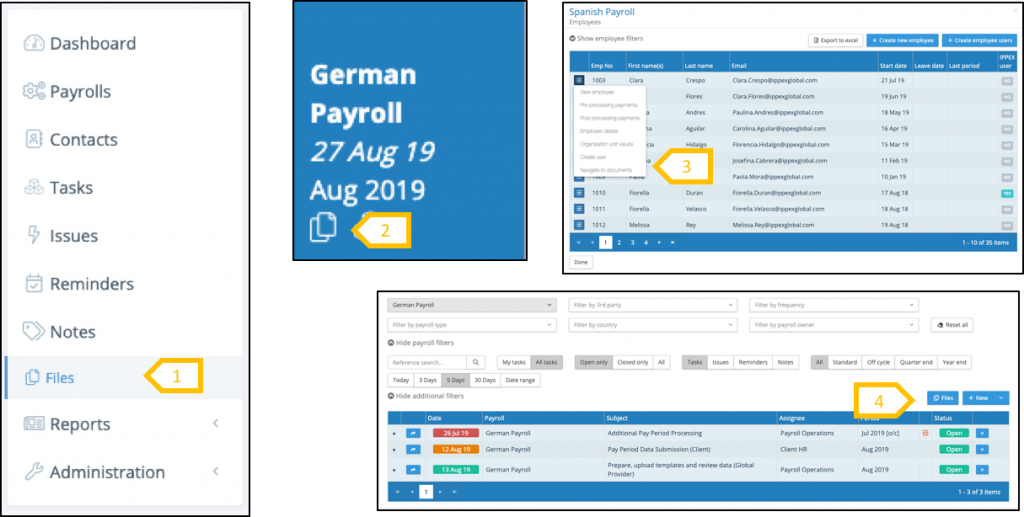
- Main menu.
- Dashboard link.
- Employee list.
- Task screen
File Management System
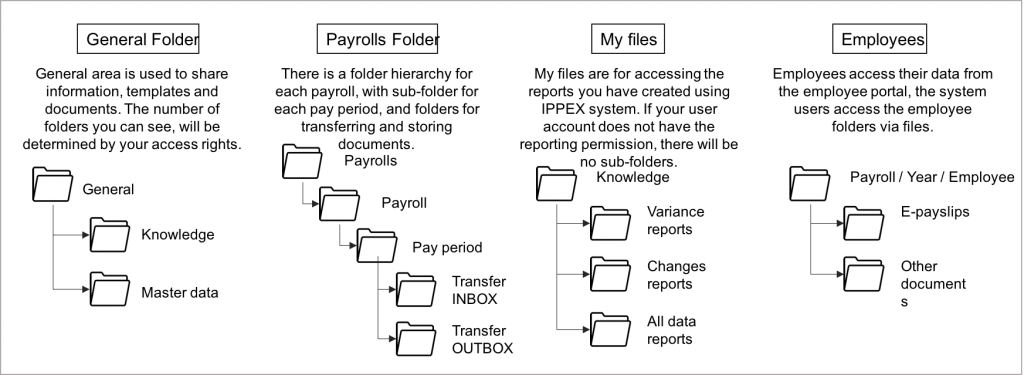
File management system is used by a number of functions within the IPPEX Cloud system. There are four main areas of Files; General folder, payroll folders, my files and employees.
Files access
The file management system has two views (panes) onto the file hierarchy, enabling a user to navigate two parts of the file management tree, and to easily transfer documents from one folder to another by simply dragging and dropping the file.
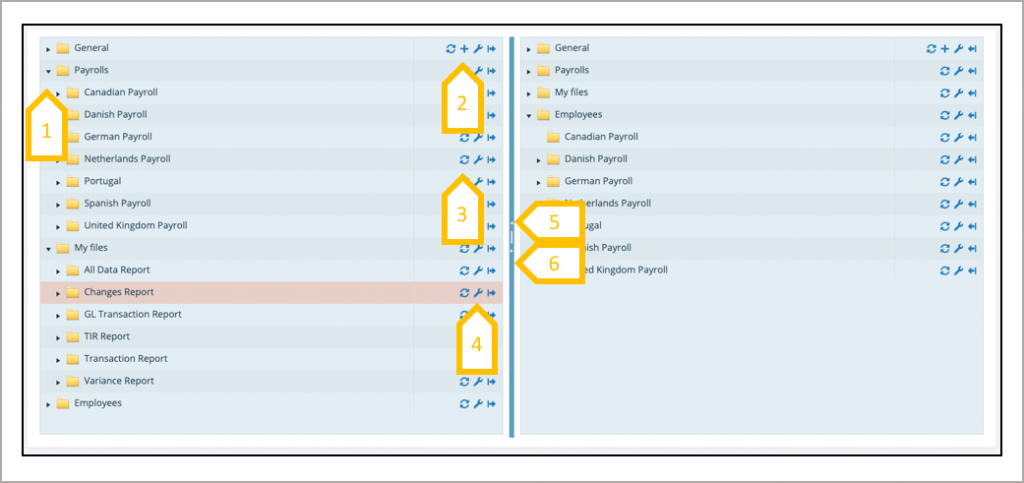
- Click on arrow head to expand the folder.
- Plus sign is to add a new sub folder.
- Circular arrow is a refresh button for the folder, this will interrogate the system to see if new files have been added from the time the file screen was opened.
- Click on the spanner to look at the properties of the folder.
- Click on the centre of the bar to reduce and expand the file panes.
- Click on arrow in the centre bar to collapse a pane, leaving only one pane.
Files View
Having navigated to a particular folder in the file hierarchy view of the file system, there is function to replicate the chosen folder view in the second file pane. This is aimed at saving time drilling down through the file hierarchy in the second panel view. Next to each folder in the left-hand panel is an arrow pointing to the right, and similarly in the right-hand pane is an arrow pointing to the left. Clicking the arrow against a specific folder will open the alternative panel at the same position in the hierarchy.
- Mirror to the right pane2.Mirror to the left pane.
Files – Managing files and documents
With the appropriate access rights files can be uploaded to a folder, selecting a file from a local file system or drag and dropping a file into the upload area. File can be deleted, downloaded, viewed or managed (change file name).
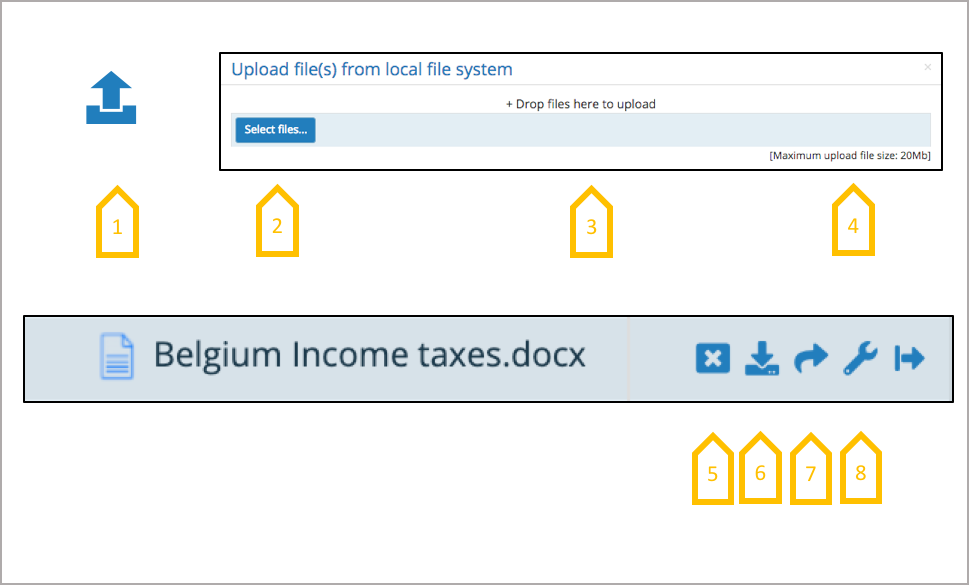
- Click on the upload button for a folder.
- Select a file from local file system.
- Drag and drop file into the upload area.
- File size limit 20MB.
- Delete a file.
- Download a file.
- View a file.
- Manage – view file properties and change file name
Files – General
Any number of sub-folder hierarchies can be created under the General folder, this is the responsibility of the tenancy administrator. Access rights have to be granted for each folder, based on payroll groups.
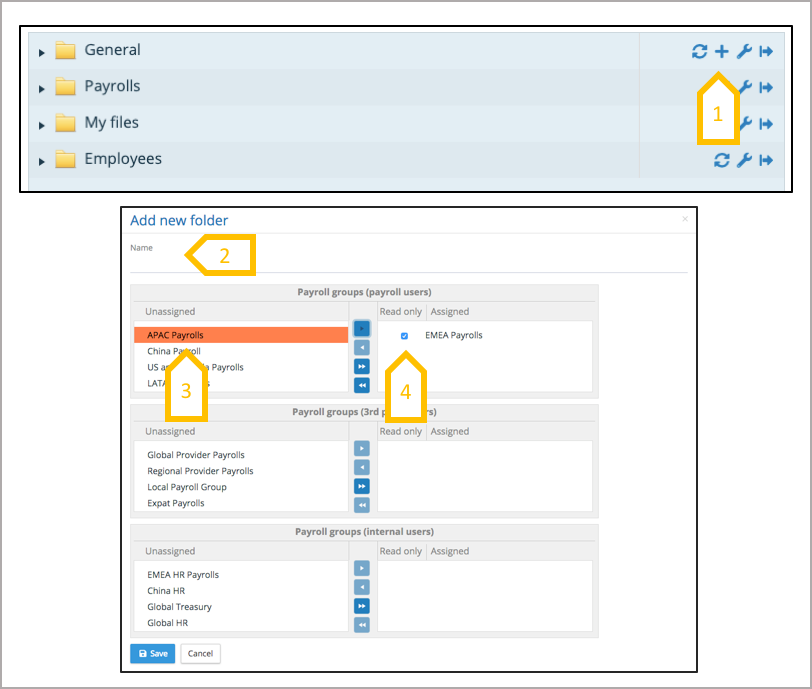
- Add a new folder.
- Give the folder a name.
- Select which payroll, internal and third party user’s payroll groups can access the folder.
- Default is read only, uncheck the box to allow write access
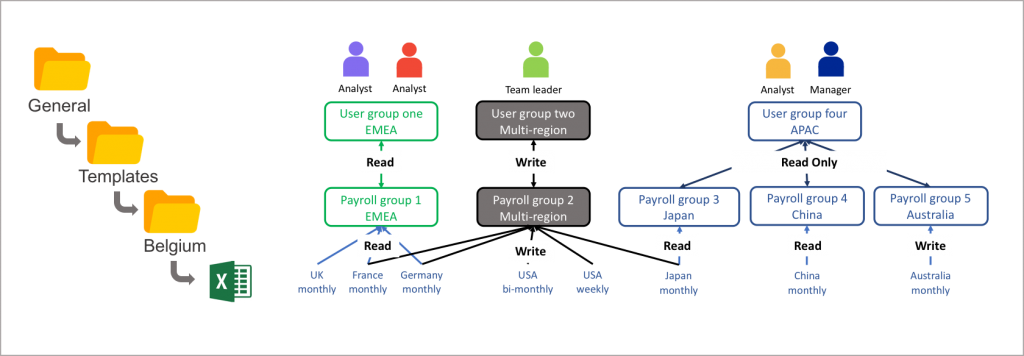
It is important to know which user groups have access to the payroll group, as a user could have multiple paths to a payroll. A user via their payroll group has to be granted access to each level of the folder hierarchy to see the lowest folder structure.
Files – Payrolls – Pay period folders
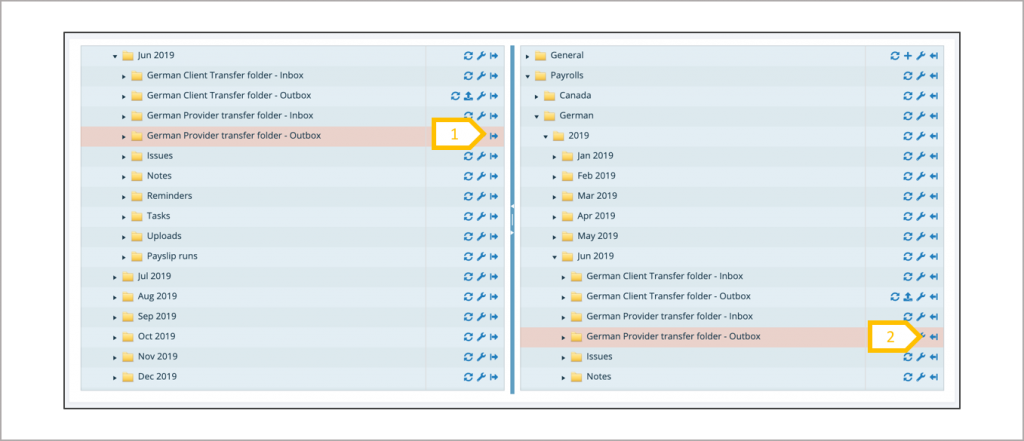
The payroll file hierarchy is generated automatically based on the payroll tax year and pay frequency, this also includes folders for the supplementary pay periods (off-cycle, quarter-end and year-end). A folder is created for each payroll and pay period, and within a pay period there additional folders relating to specific functions.
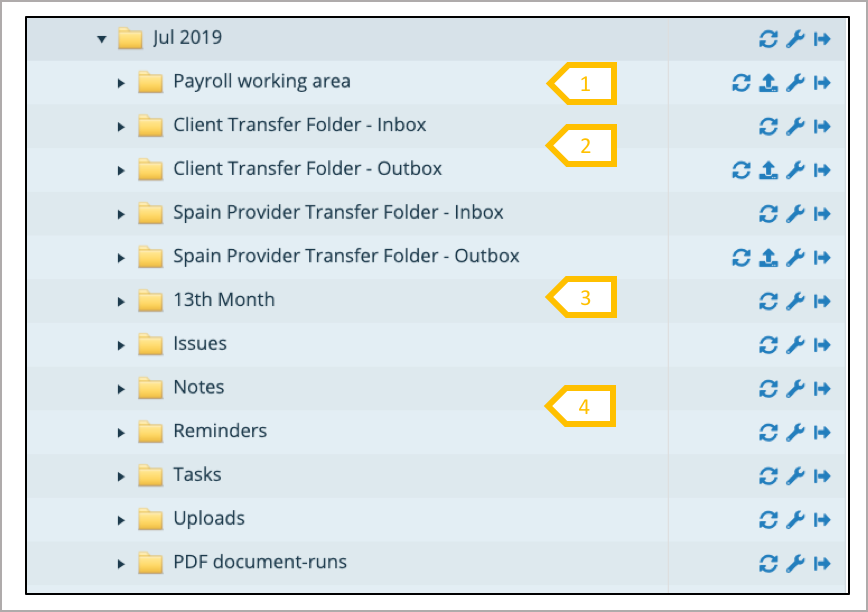
- Working areas can be set-up for payroll users, internal users and 3rdparty users (based on payroll groups) see Workspaces.
- Internal and third party transfer folders, to exchanging documents between payroll users and internal/3rdparty users (based on payroll groups).
- All supplementary periods (off-cycle, quarter-end or year-end) are connected to a pay period and are given a folder.
- Any attachments to tasks, issues, reminders and notes for a given pay period can be found in these folders.
Files – Payrolls – Upload folders
For each Pre-processing and post processing uploads and PDF document runs the system generates a folders and documents associated with those processes. With any of these processes it is important to review the results files to track any errors that could have occurred within the process. See user guidance for uploads and PDF documents.
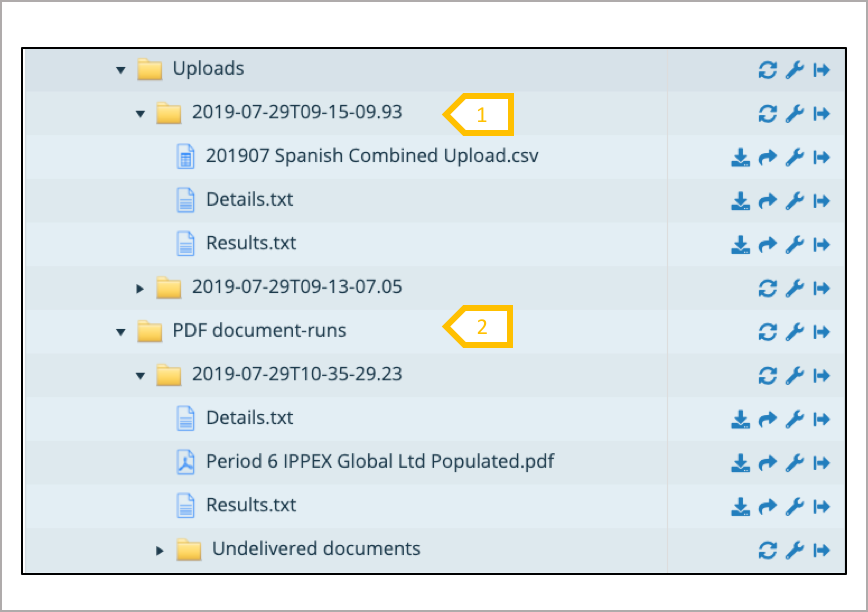
- For each pre-process or post-processing data upload the system will generate a folder, containing a file called details (details the upload parameter set), the upload file and results, which lists any errors or omissions from the process.
- For each PDF document-run a folder is generated, containing a file called details (details the document-run parameter set), the document file used for the run and results, which lists errors, those document selected to be ignored and successful documents. In addition, any documents rejected by the process are placed in the undelivered documents folder.
Files – Payrolls – Employee upload folders
Employee records are held against the payroll. When an employee upload is processed the system generates a folder for each upload, these uploads can be found under the payroll folder and NOT the pay period folder.
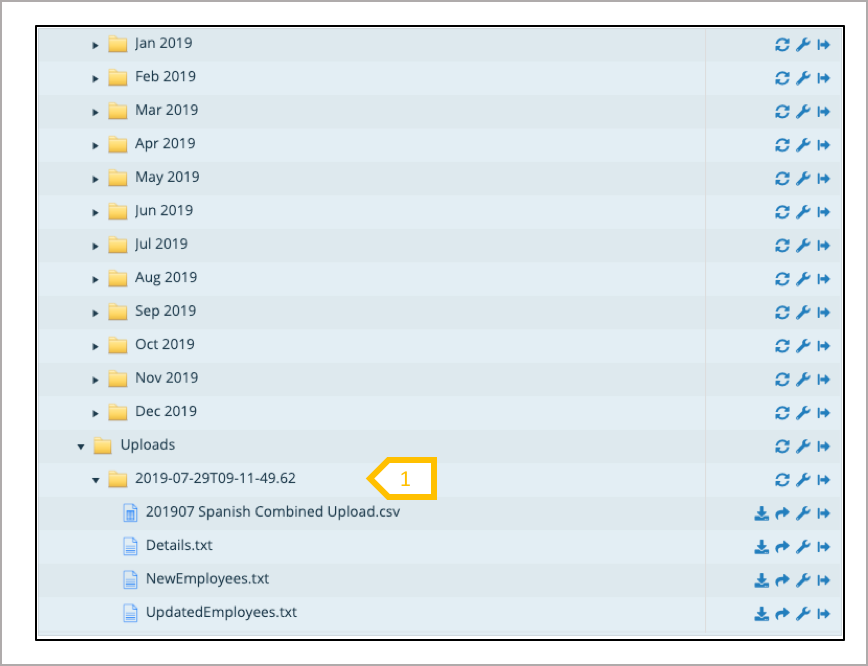
- For each employee upload to payroll will generate a folder, containing a file called details (details the upload parameter set), the upload file used in the process, new employees generated and a file detailing the employees updated.
Files – Payrolls – Transfer Folders
Transfer folders are set up against internal or third party payroll groups, It allows internal users who have access to the internal payroll group to transfer files to payroll users for a particular payroll. It is a pair of inboxes and outboxes, an internal user can upload a file to their outbox and this will appear in the payroll users inbox, similarly a payroll user can upload a file into their outbox and this will appear in the internal users inbox. The same applies to third party users exchanging files with a payroll user.
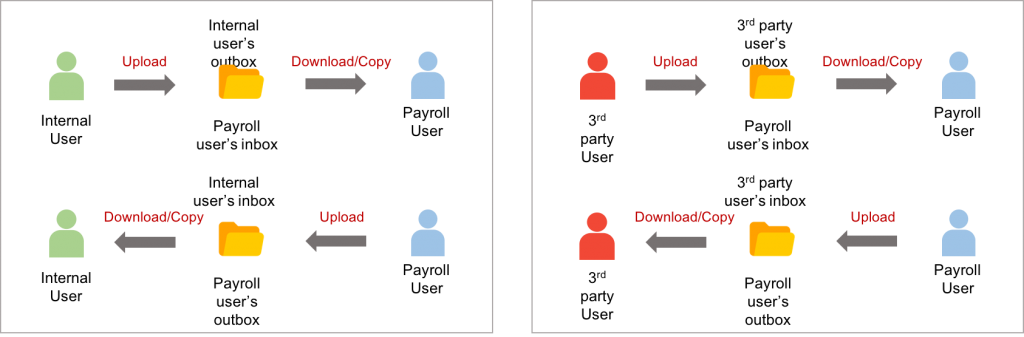
NOTE:A file uploaded to a transfer folder can be deleted up until the other party has either viewed or downloaded the file
My files
The My Files folder is specific to each user, it stores all of the reports requested by a user. There is a folder for each type of report, and within each of these folders, sub folders are generated for payrolls.
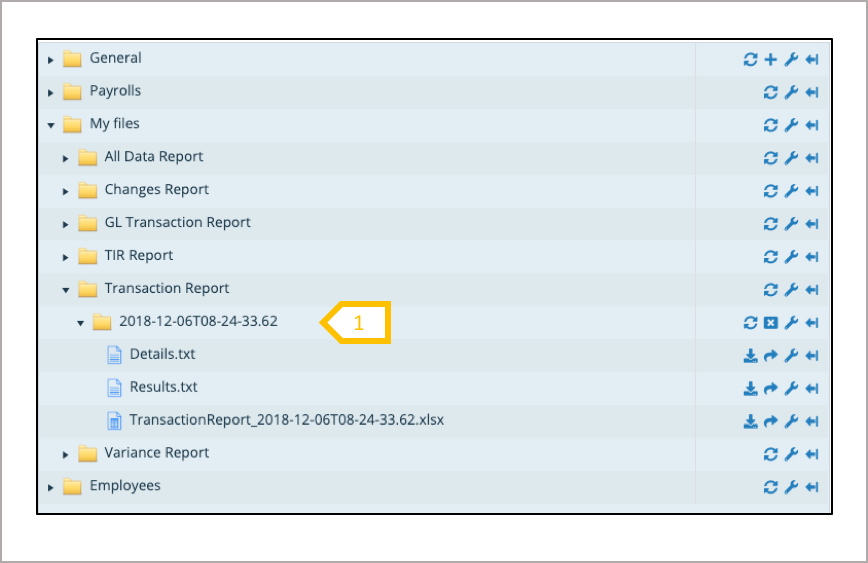
- For each report processed the system will generate a folder, containing a file called details (details the report parameter set), the results (any errors), and the report requested.
Files – Employees
Employee folders contain the PDF documents and payslips uploaded to employees. The system generates a folder hierarchy payroll → tax year → employee. Each employee has two folders, those documents uploaded using the initiate PDF document-run and those uploaded manually. The files have a specific naming convention this is used by the system to display the document in the right order and area for the employee. (see PDF document-run user guidance)
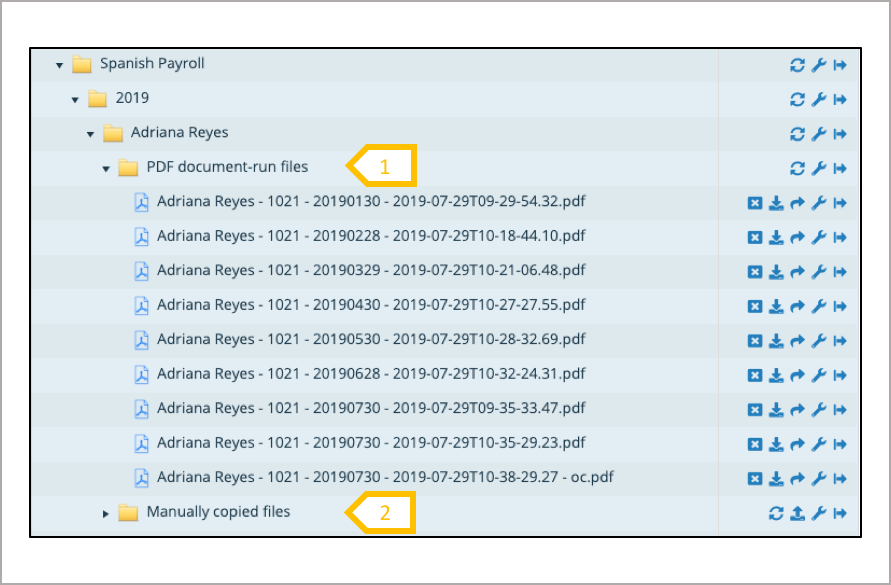
- PDF document-run files uploaded by the system through the initiate document-run process.
- Manually copied files for those files uploaded to the employee folder manually, files have a specific naming convention.