Payroll changes upload
For each payroll and pay period, a user with the appropriate upload permissions can upload data to the IPPEX system. The following user guidance covers pre-processing data and employee details. The upload process is similar to the employee record upload. The pre-processing data is uploaded against employee details or pre-processing pay elements for that payroll. New employee details and pay elements can be created during the upload process. Employee details can also be uploaded with the post processing data upload (gross to net).
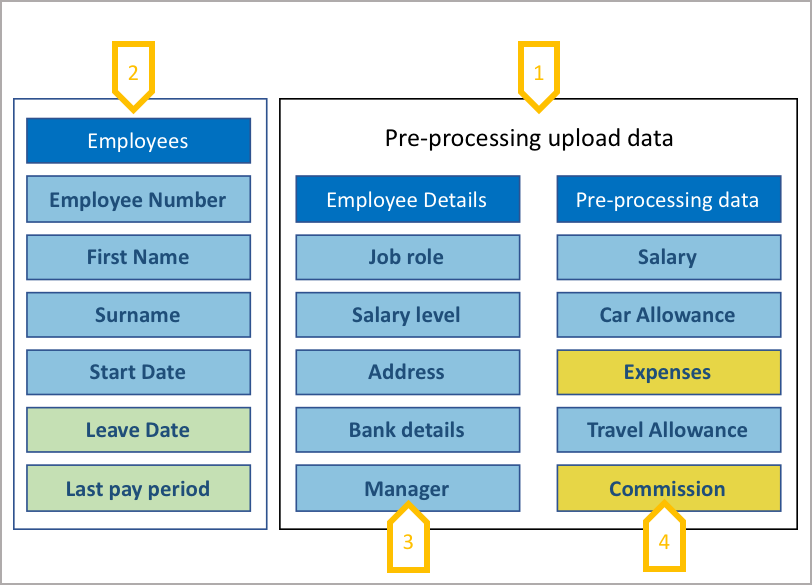
- Any number of employee details or pre-processing element can be stored against a payroll.
- An employee has to be created against the payroll before employee details or pre or post-processing data can be uploaded to the payroll and employee.
- The value uploaded against a persistent employee detail or pay element for the current pay period will be carried forward to the next pay period, and therefore remains constant for each pay period unless changed or ceased e.g. car allowance.
- The value of a non-persistent employee detail or pay element is only for that pay period. E.g. commission. ●
Persistent and non-persistent elements
The system holds employee details and pre-processing pay elements at a payroll level, the data is loaded by pay period. All persistent employee details and pay elements (data) are carried forward to the next pay period, the values will remain constant until updated in a future pay period, in this example below the car allowance is persistent, carrying forward from January to February, until it is ceased in March.
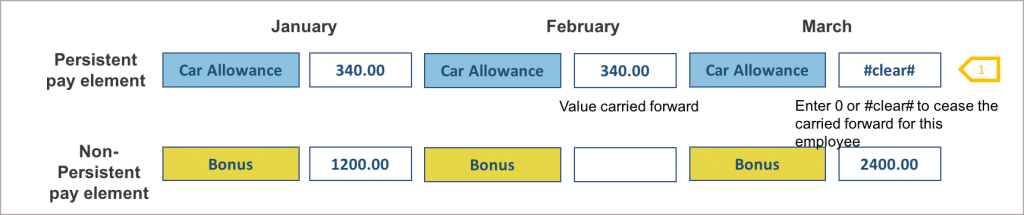
- IMPORTANT TO NOTE: the system treats a ‘null’ field in a CSV upload file as NO DATA. Where an employee detail or pay element has been set as persistent, for example a car allowance, the value is held for each pay period. If this car allowance has been changed then the new value has to be uploaded. If the car allowance has been withdrawn, a zero value or #clear# has to be entered into the data field on the upload file to cease the payment
Pre-processing upload file format
Any data upload is performed using the employee number as the key to bind the employee details and pay element data to that employee. The file has to be a CSV UTF-8 format, the column headings can be in any order and do not have to match the pay elements in the IPPEX system. New pay elements and employee details are generated on the first upload of that particular data type. Data uploads can be broken down in to multiple files and uploads. The upload file must not have duplicate header names or special characters.

- Employee number is the key to employee upload.
- The upload file can include employee attributes such as first name and last name, these are set to be ignored during the upload process.
- Any number of pre-processing pay elements, if there is a new column heading (new data type) the corresponding pay element is created during the upload mapping process.
- Any number of employee details, if there is a new column heading (new data type) the corresponding employee detail is created during the upload mapping process.
Upload – Payroll changes upload
From the payroll screen, click on the action button, go down to UPLOAD and select pre-processing → payroll changes upload

Pay Period Locking
Pay periods have a sequential locking process. Pre-processing data can only be uploaded to a payroll and pay period when the previous pay period gross to net upload has been locked. The pre-processing upload has to be locked before gross to net data can be uploaded. A locked pay period can be unlocked, this too is a sequential process, unlocking gross to net data before the pre-processing can be unlocked, Any user with upload permissions can lock a pay period, only those users with un-lock permissions can unlock a pay period.
When a pay period is unlocked, data and mappings can be deleted (a process called clear down) for a pre or post processing upload, there is specific page in the user guidance relating to clear down.
Locking a pre-processing upload prevents any further uploads for this pay period of pre-processing data, and all persistent pre-processing pay element values for each employee are carried forward to the next pay period with the first upload in the next period.
- To lock payroll changes upload, this will prevent any further uploads to this pay period for pre-processing pay element data.
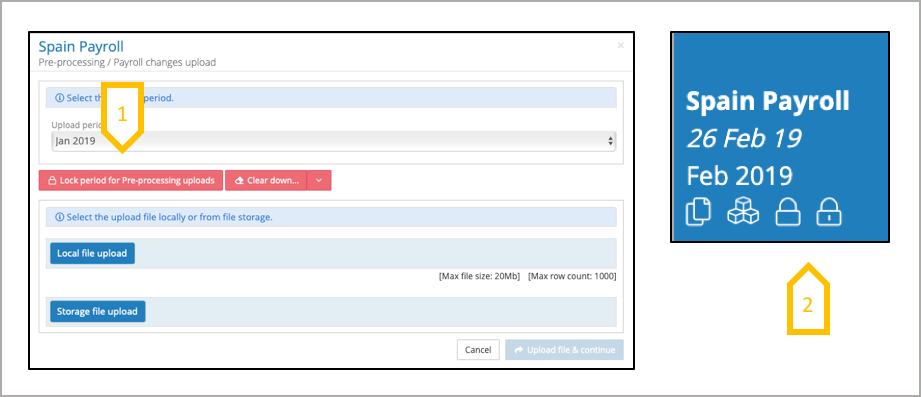
- Payroll dashboard shows two padlock symbols for a payroll and pay period, the first one indicate that the pre-processing has been locked and the second indicate the gross to net upload has been locked.
Initiating the pre-processing upload process
The upload screen can be used for a number of functions, the primary function is to upload employee details and/or pre-processing pay data, it also allows the user to lock the pay period from further pre-processing data uploads, it also enables you to delete employee details, organisation unit values and pre-processing pay data previously uploaded to this pay period. The first upload performed in a pay period, will copy across the persistent values from the previous pre-processing pay period.
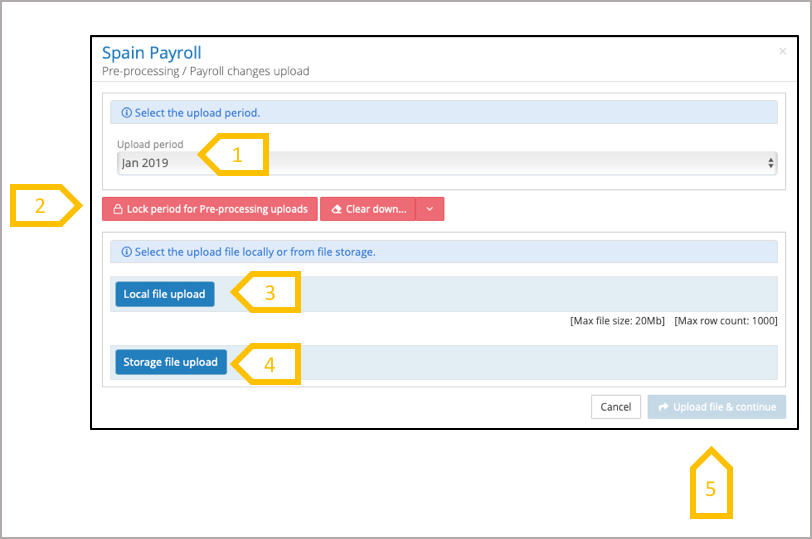
- Check that the upload is for the right pay period.
- If the gross to net upload for the previous period has not be locked, the system will display a message in red, ‘this pay period is locked for upload’.
- Select a file from a local or network file system.
- Select a file from the IPPEX file system.
- When a file has been selected click on upload file and continue
Mapping the first upload to a payroll
All pay elements and employee details are local to a payroll. Pay elements do not need to be pre-defined globally and they do not need to be defined in advance of loading the pre-processing data. Employee details and pay elements are created during the upload process. For organisation units are covered in a separate slide)
The names given to the employee details or pay elements can reflect those held in an HCM system or those needed by the local gross to net system. Any number of language translations can be held against Employee details and pay elements names. On the initial upload to a payroll, the user has to give each new employee detail or pay element a name, during this process the system creates a mapping between the pay element name or employee detail name, and the column heading in the data file. This mapping is stored for all future uploads,
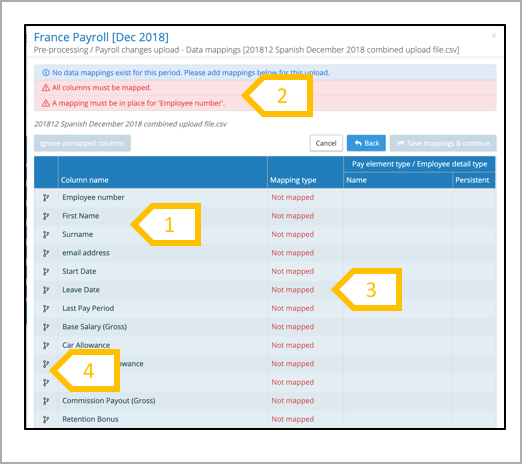
- These are the column headings from the upload file.
- Message states that all of column headings have to be mapped or ignored. That the employee number column in the upload file has to be mapped to the system employee number as this is used as the key to assign the data in the file to the employees.
- The system prompts the user to map the upload file column headings with a pay element or employee detail, for the initial upload, the user will be creating the pay elements and employee details for this payroll.
- Action button for creating the mappings
Mapping employee details and pay elements
For the initial data upload each column heading has to be mapped to a new employee detail and pay element (with the exception of organisation units). Using the mapping action button next to the column name select the mapping type. All those columns (data) which are not needed for this upload can be ignored, this can be done either using the mapping action button setting ignore for each element or click on ignore all unmapped columns after the employee details and pay elements have been mapped.
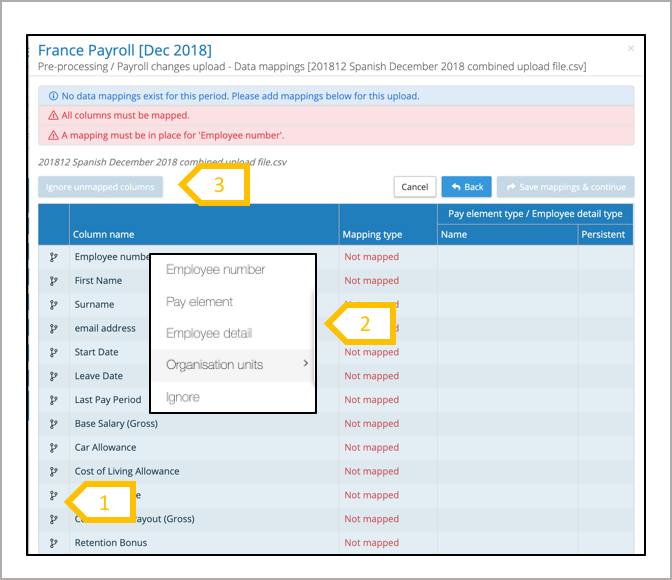
- Click on the mapping action button next to the column heading.
- Select the one of the mapping options, employee number, pay element, employee details or ignore. Employee number can only be mapped to one column heading.
- When all of the elements which required to be mapped are completed, use ignore unmapped columns to ignore the remaining headings.
Mapping process
The mapping process is the similar for pay elements and employee details. For the initial upload of data, the user will be creating new elements for all the column headings. During future uploads if a column heading has changed from the last upload, it will require a new mapping to an existing element on the system. If there is a new column heading in a future upload, a new element will be require, but doing this it is important to check if the appropriate employee detail or pay element has already been created.
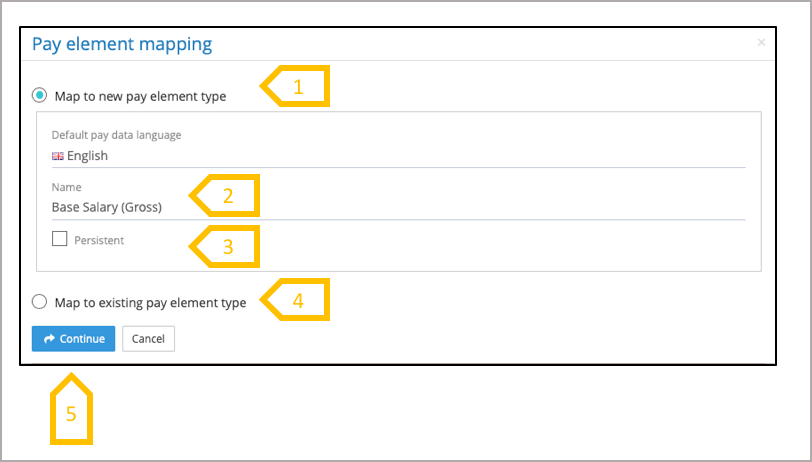
- The mapping screen defaults to mapping to a new pay element or employee details.
- Creating a new element. Give the pay element or employee detail a name, the system offers the column name in the upload file, overwrite this if you would like an alternative name, the new name cannot be the same as an existing element.
- Check the box if the pay element or employee detail is persistent.
- Map to an existing pay element or employee detail, a drop down list is presented.
- When the selection has been made, click on continue. ●
Mapping Organisation Units
Organisation units are enabled at the client tenancy level, for a given pay period organisation unit values can be uploaded against an employee. Organisation unit values are persistent, carried forward to the next pay period until changed or cleared. The data upload columns containing the organisation unit values have to be mapped to the appropriate organisation unit. During the upload process if a organisation unit value has not been defined in the unit permissible list, an error will occur and the value will not be stored for that individual.
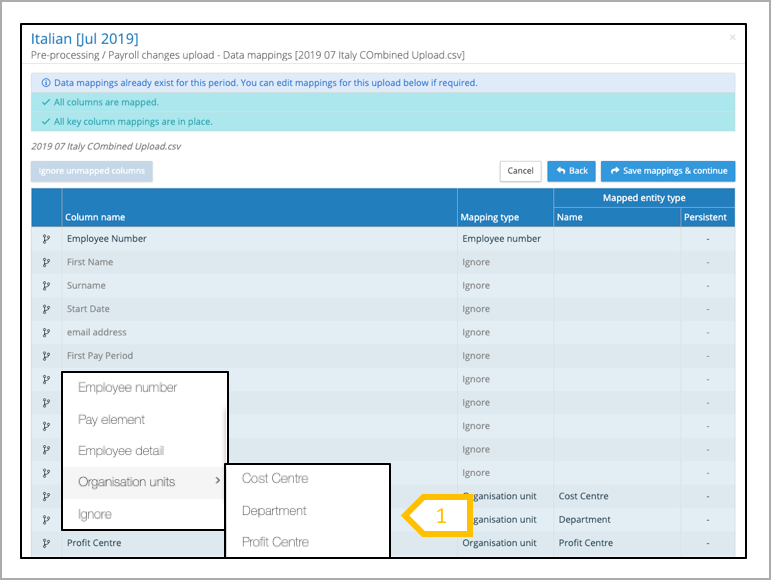
- Map upload heading to the appropriate organisation unit.
Saving mappings and continuing with the upload process
When all of the column headings have been mapped or set to be ignored, The message will indicate that the user can proceed to the next stage of the upload process.
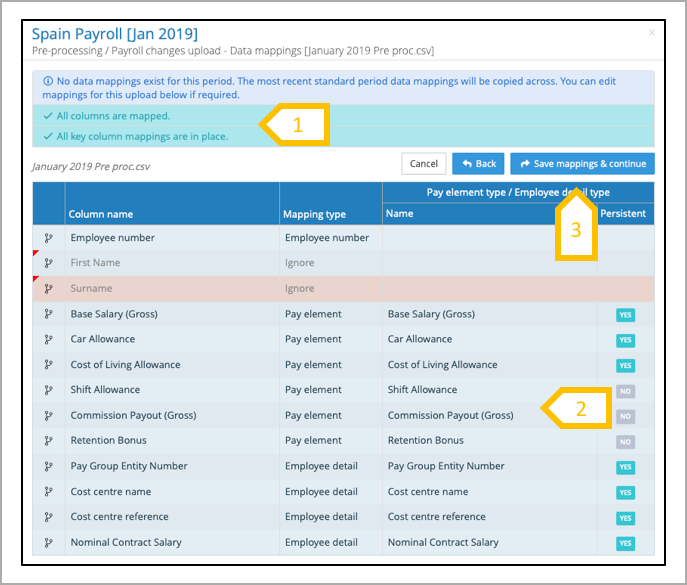
- Message saying all columns are mapped and all key column mappings are in place (employee number has been mapped).
- Before progressing the upload check that all of the columns have been mapped to the appropriate employee detail or pay element, and whether they are persistent or not. Progressing to the next stage of the upload process is when the new employee details and pay element are created. When a pay element and employee detail are created they cannot be deleted as data may be held against the element.
- Click in save mappings & continue, the system will store all of the current mappings for future uploads to this period and future periods.
Submit upload
The final step in the pre-processing upload is to submit the upload. The data upload process is a background function, allowing the user to continue their work on other activities in the IPPEX system. When the upload process completes, the system will send an email notification providing an upload summary, stating if it was successful or if it failed.
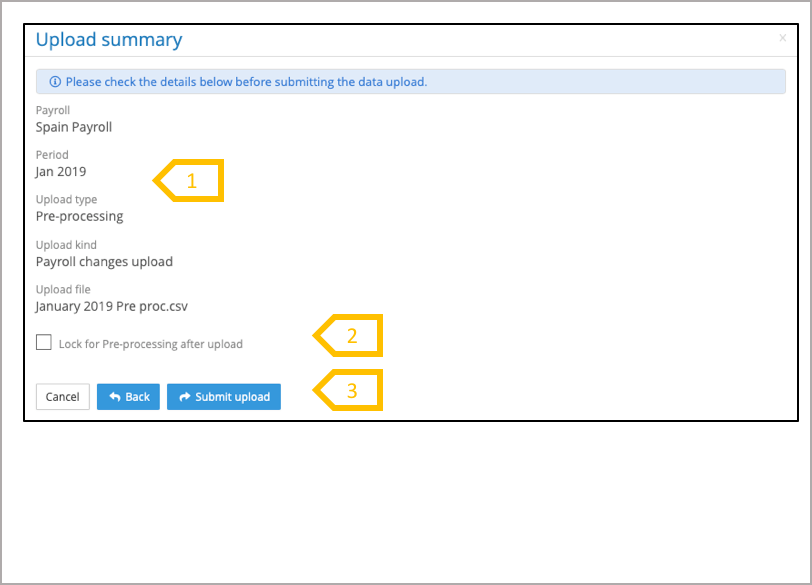
- Summary of upload, this is the last chance to check if the upload file Is correct and the upload is to the correct payroll and pay period.
- If this is the last of your pre-processing data uploads to this period, there is an option to check the box to lock the pre-processing period after the upload.
- If everything is correct, click on submit upload. The system will process the data in the background, sending a system generated email when the upload is complete.
Upload confirmation
When an upload is completed by the system, an email notification is sent to the user who performed the upload. The email summarises the file name uploaded, to which tenancy, payroll and pay period. It also states if the upload was successful. The system automatically stores a copy of the file uploaded, the details of the upload instructions and results of the upload, this is information can be found in files in an upload folder for the payroll and pay period.

- An upload process is can be one of the following: successfully completed, completed with errors or aborted.
- List of the client tenancy, payroll, pay period and file name uploaded to the system.
- Link to the upload results folder
Upload results
For each upload the system will create a new folder for the payroll and pay period, un uploads. The folder name has a date and time stamp when the upload process was completed. The folder contains three files, the upload instructions, the upload file and the results of the upload.
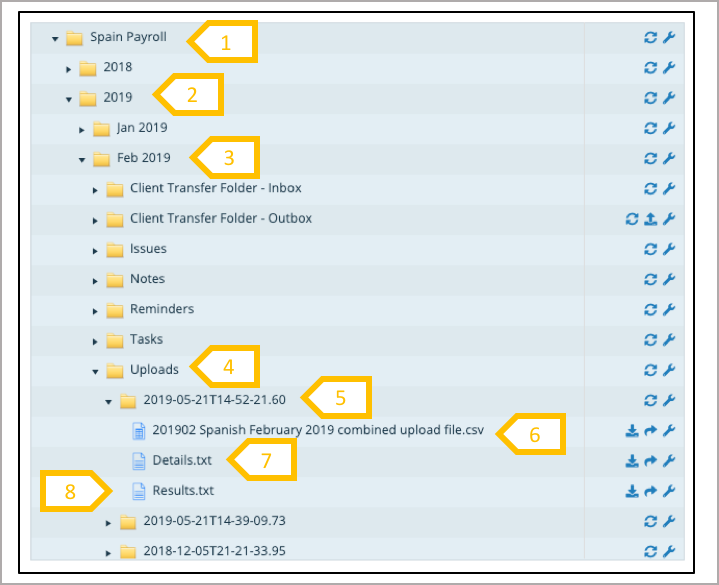
- Payroll
- Tax year
- Pay period
- Uploads folder
- Folder for upload
- Upload file
- Details – contains the upload instructions
- Results – Lists the errors and successful upload of data
Multiple uploads
Multiple uploads can be performed for a payroll and pay period. Each upload will either add new data or overwrite existing data, or change a persistent value.
Adding new data – An upload could be acting on data elements which have not been included in a previous upload file, for example the first upload could be changes to salary and allowances, the second upload could be commissions.
Overwriting data – The salary changes for a pay period, could be uploaded in two or more files. Any change made in the first upload could be overwritten (changed) by the subsequent uploads.
Updating persistent values – Any persistent employee detail or pay element can be changed during the upload process. The system will carry forward from the previous pay period all of the persistent values. When a new value for an employee is uploaded to a persistent employee detail or pay element, this will become the value which will carried forward to the future pay periods. To end a persistent value enter #clear# for the pay element or employee detail of an employee.
When performing multiple uploads to a pay period, to accumulate the build up to gross data, it is important to run a changes report for that payroll and pay period to ensure all of the changes data is correct. When all of the data is correct, lock the period to prevent any other data from being uploaded.
Clear down
The clear down function allows for the deletion of pre-processing pay data, employee details and pre-processing upload mappings. The clearing down employee details or pay elements will delete all of the data for that period including the persistent values carried across from the previous period. On re-uploading of data, the first action performed by the system is to copy across the persistent values. During the upload process for a pay period, the system fixes the mappings from a column heading to a pay element, if the new upload file has column headings names which differ from the first upload, it may necessary to delete the pre-processing upload mappings, to create set of mappings.

- Clear down has a drop down menu, enabling the user to select pre-processing pay elements, employee details or pre-processing upload mappings. Select the which of these to clear down, the system will return a message saying ‘are you sure’. Click yes to proceed with the action.