IPPEX Cloud V 1.40 Release Notes

Introduction
Version 1.40 focuses on a centralised auto-upload function and the ability to receive data feeds via sFTP with PGP encryption. It also includes an enhancement to GL Journals and the ability to add a digital signature to PGP encrypted files.
Tenancy Auto-Upload
The auto-upload framework has been extended to allow for the upload of files to a single tenancy auto-upload folder. This new functionality has introduced a separate mapping process for all auto-uploads (payrolls and tenancy).
The key features are as follows:
- The ability to add combined (list or tabular), pre-processing (list or tabular), post-processing (list or tabular) and time/unit (list) upload files for any payroll into the tenancy upload folder and submit files individually or as a batch.
- A single upload files can contain data for multiple payrolls
- Files can be retrieved from an sFTP folder directly into the tenancy upload folder.
- The ability to copy manual upload mappings to the auto-upload mappings (these are mappings created when files are uploaded via payroll upload control panel) or to create auto-upload mappings that are different to the manual upload mappings.
NOTE: for existing users of auto-upload at a payroll level, the current upload mappings must be copied to the new auto-upload mappings.
Auto-upload mechanism
The auto-upload function provides a facility to bulk upload data files for a payroll and pay period. This is ideally suited to organisations generating changes data in a consistent format from HR systems or the completion of structured templates. Similarly, this enhances the upload of gross to net data from a local payroll system.
There are four upload functions split by upload file format (tabular or list)
- Combined upload (List or tabular) – For the upload employee record, address, bank, employee details, organisation units, pre-processing period and permanent pay elements.
- Pre-proc uploads (List or tabular) – for the upload of employee details, organisation units, pre-processing period and permanent pay elements
- Post-proc uploads (List or tabular) – for the upload of post processing pay elements, employee details, organisation units and payments
- Time/unit uploads (List only) – for the upload of time/unit data
The auto-upload mechanism relies on the following components being present:
- Upload Identifier – The upload file requires a column which contains an upload identifier. For each data line in the upload file an encrypted key is required which is specific to the payroll and/or upload type.
- Pre-mapped – The upload file headings must be mapped for auto-upload, including the upload identifier column prior to using the auto-upload facility.
- Unlocked – The appropriate pre-processing or post-processing period must be unlocked to allow for the data to be uploaded.
Files are uploaded to either the tenancy auto-upload folder or the payroll upload folder which is split by upload type and file format. The file or files are submitted for upload.
Upload Identifier
Each data line in an upload file must contain an upload identifier if the auto-upload mechanism is to be used.
The tenancy administrator has access to a set of payroll identifiers, go to administration > settings > upload identifiers, this page contains all of the identifiers for each payroll, upload type and file format (Tabular or List).
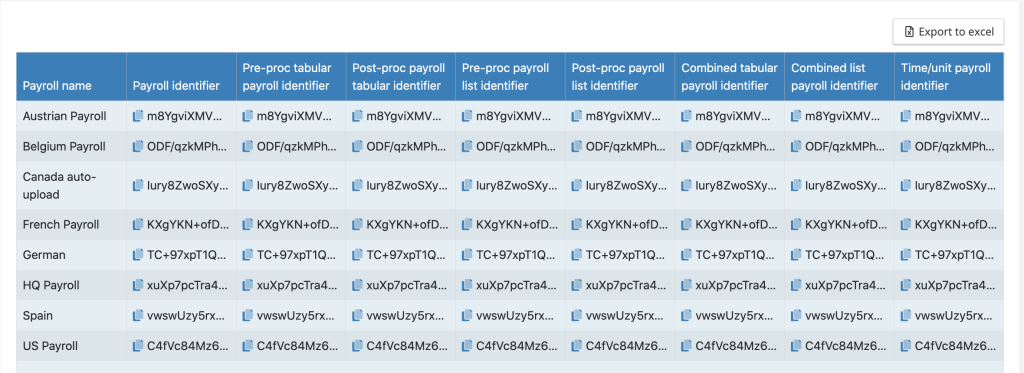
The upload identifier is used by the tenancy upload mechanism to determine which payroll the data is for and the upload type to be used. The upload identifier also prevents the upload of erroneous files and to a tenancy.
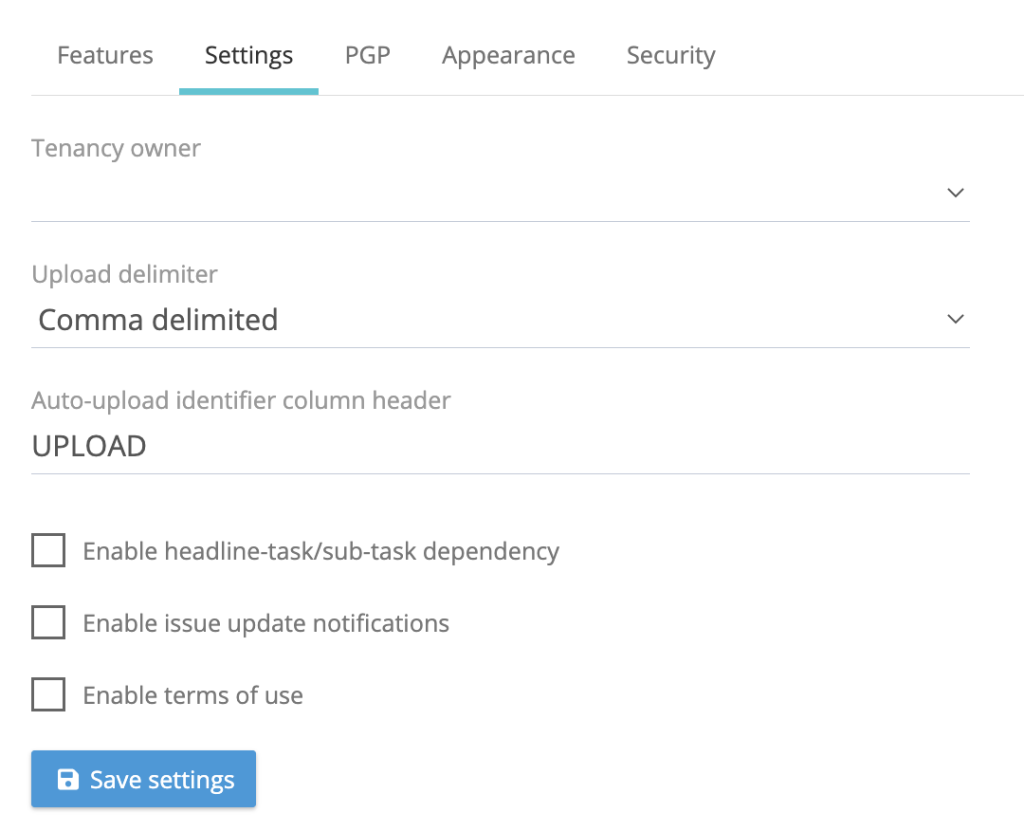
The upload file must have a column containing the upload identifier. Auto-upload requires a specific naming convention to the upload identifier column heading name, the default option is Upload Id. Please note this is case sensitive so a capital U and I, with a space between Upload and Id. The upload identifier column naming can be changed for a tenancy, go to administration > settings > settings, change the default name to the one that is going to be used for the tenancy.
Upload mappings
There are two types of upload mappings, those for manual uploads performed via upload control panel and those for auto-uploads files presented to the system via the tenancy or payroll auto-upload folders. All upload mappings are specific to a payroll. For the creation of auto-upload mappings, from the payroll menu, please go to payroll configuration > auto-upload mappings and there are seven mapping options:
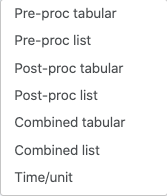
Click on the upload type, this will open the following screen.
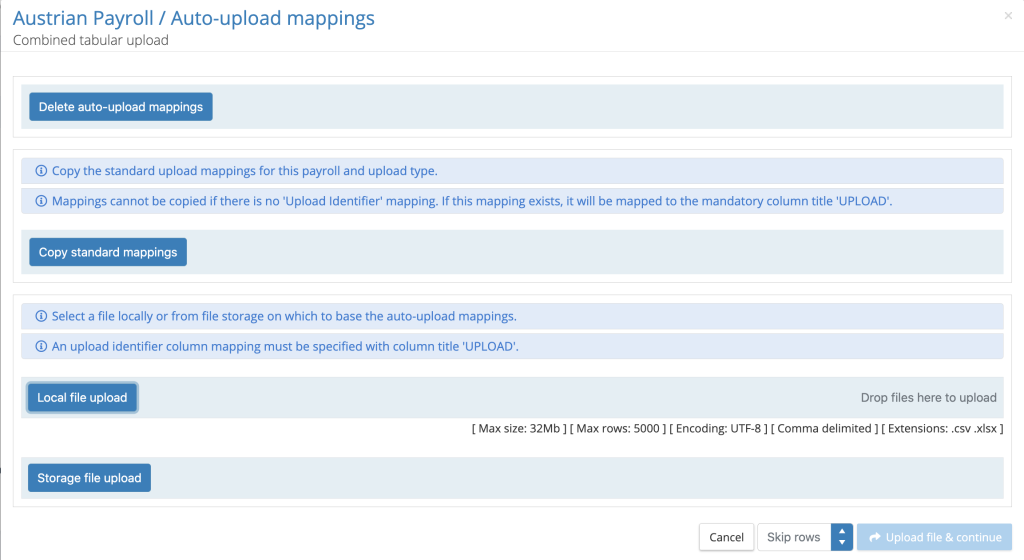
To create the auto-upload mappings there are two options:
Copy standard mappings: Copy the standard mappings, these have been created via a manual upload using the payroll control panel. When performing manual uploads via the upload control panel, for each upload type and file format, mappings are created between the column headings/element types to the system data fields. These mappings can be copied to the auto-upload mechanism, provided the upload identifier has been mapped beforehand.
Create auto-upload mappings using an upload file: Upload a data file that is for a specific upload type and start the mapping process. The system will look for a column name containing the upload identifiers, this will either Upload Id or the name of the column heading that has been entered into system settings under the heading auto-upload identifier column header. If the system cannot find a column heading for the upload identifier, the system delivers an error message.
For all list uploads there is a two-stage mapping process, first stage is mapping the column headings and the second stage is to map the elements.
The payroll auto-upload mappings for an upload type can be deleted, click on the delete auto upload mappings
Auto-upload Folders
For all auto-uploads the upload identifier must be mapped and each data row in the file must have the appropriate upload identifier. Auto-uploads can be performed using the payroll auto-upload folders or using the tenancy upload folder.
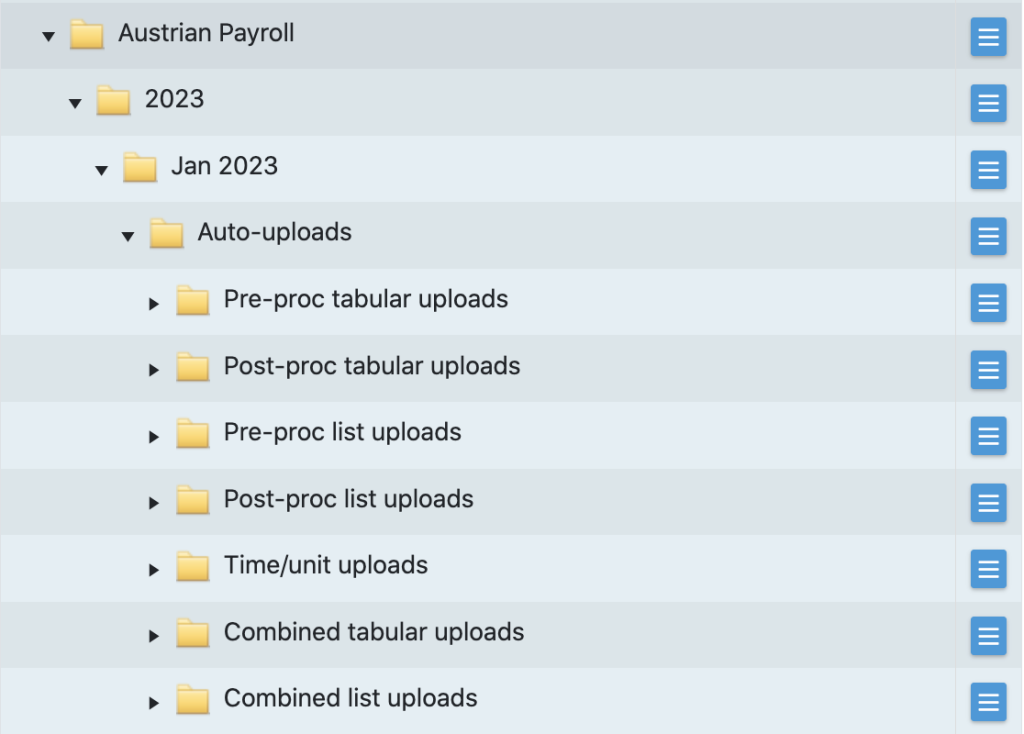
Payroll Auto-upload folders: From FILES navigate to the payroll, payroll year and pay period folder, there is a folder called Auto-uploads, expand this to see seven upload folders. Files must be specifically for that payroll and upload type, any file containing upload identifiers for an alternative upload type or payroll will result in the data row being rejected. Files can also be uploaded to the parent folder Auto-upload and the system will determine the upload type from the upload identifier.
Tenancy upload folder: From FILES navigate to Tenancy and Auto-uploads. Tenancy upload folder can be used for any file containing an upload identifier that has been mapped for a payroll and upload type. The system will use the upload identifier to determine the payroll and upload type.
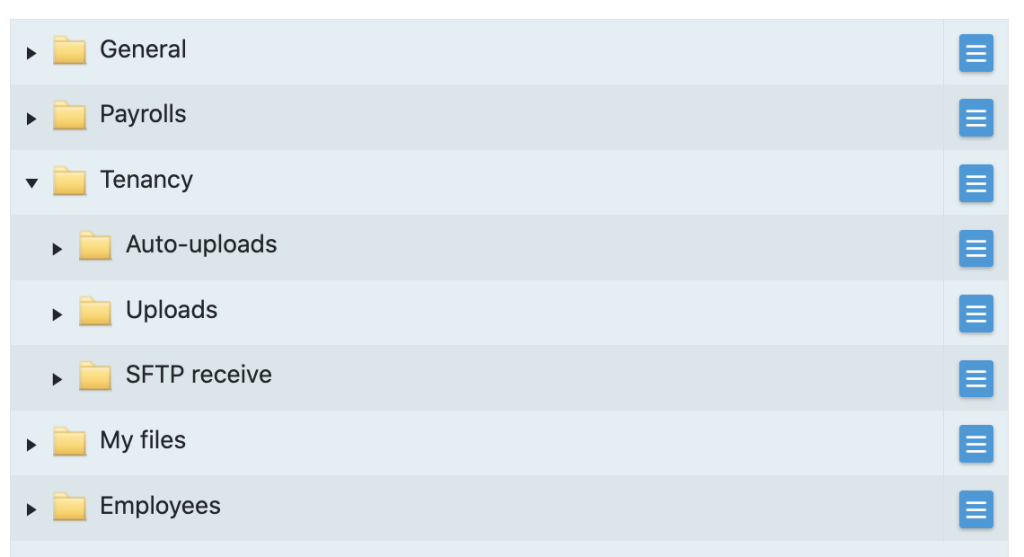
The tenancy upload folder can be linked to an sFTP file transfer mechanism, see notes on sFTP Receive.
NOTE 1: The combined auto-upload will automatically create new employee records, if the file contains a new employee number. If the wrong upload ID has been applied to the data rows in a combined upload, it may result in new hires being generated.
NOTE 2: If there are pre-processing, post-post processing or time/unit uploads containing data for new hires, the employee record must be created before the files can be submitted. Where there are multiple data files for a pre-processing period, always present the combined upload file first containing the new hires.
File upload for auto-upload
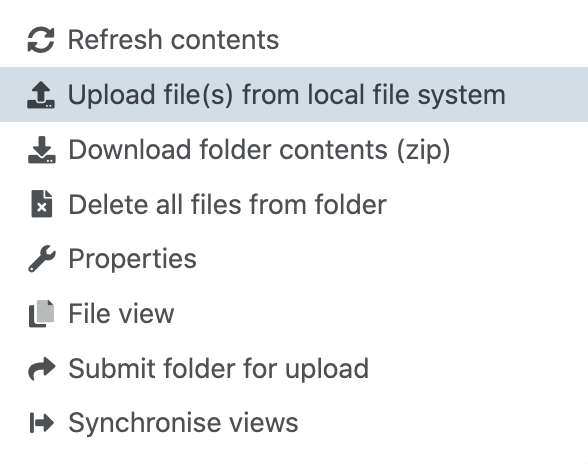
From either the payroll auto-upload folder, the payroll auto-upload specific folder types or using the tenancy auto-upload folder click on the action button and select upload file(s) from local file system.
Any number of files can be added to a folder ready for upload.
Submitting files for auto-upload
For all auto-upload folders (payroll or tenancy), individual files can be submitted for upload or all the files in a folder can be submitted for upload.
Submitting a folder for upload: From the action button next to the auto-upload folder, click on Submit folder for upload. When multiple files are submitted, they are added to the upload queue and will be processed in an order determined by the system.
Submitting a file for upload: From the action button next to the file in the auto-upload folder, click on Submit file for upload.
Auto-upload Results
For each payroll auto-upload a sub-folder will be generated under the upload type with a date/time stamp where the system records the following information for every upload:
Upload file: A copy of the data file being uploaded
Details.txt: this is lists the who performed the upload, when the upload was initiated, the name of the file uploaded and any system/upload settings.
Results.txt: This contains a list of the successful rows (employee data) uploaded, ignored rows and errored, with an error message.
ErrorRows.xlxs: Where data rows have been errored these are written to an Excel file, which can be used to correct the errors and re-submit the data.
For tenancy uploads the results folder is structured by year and by month, for each upload performed in a month the system will have created a date/time stamp folder contains the file submitted for upload, a details file stating the user who submitted the file and a results file detailing if the tenancy upload was successful. The system will generate a sub-folder for each of payroll uploads contained in the tenancy upload submission. For example, if an individual upload file contained data for a number of payrolls, the system will segment the data into separate data files, each will be placed in a sub-folder with its associated results file.

The sub-folders will also contain error row files if there are any data row upload failures.
Receiving files via SFTP
IPPEX Cloud can be configured to pull files from one or a number of sFTP servers directly into the tenancy auto-upload mechanism. The sFTP receive has options to automatically upload the file, delete the file from the sFTP server and to only collect files with a specific prefix. This functionality is ideally suited for receiving data files from HCM systems.
SFTP Configurations
From the administration menu, go to SFTP configs and there are two sub menus, Inbound SFTP and Outbound SFTP. To set up the system to allow users to pull documents from an SFTP service, configure an inbound SFTP service.
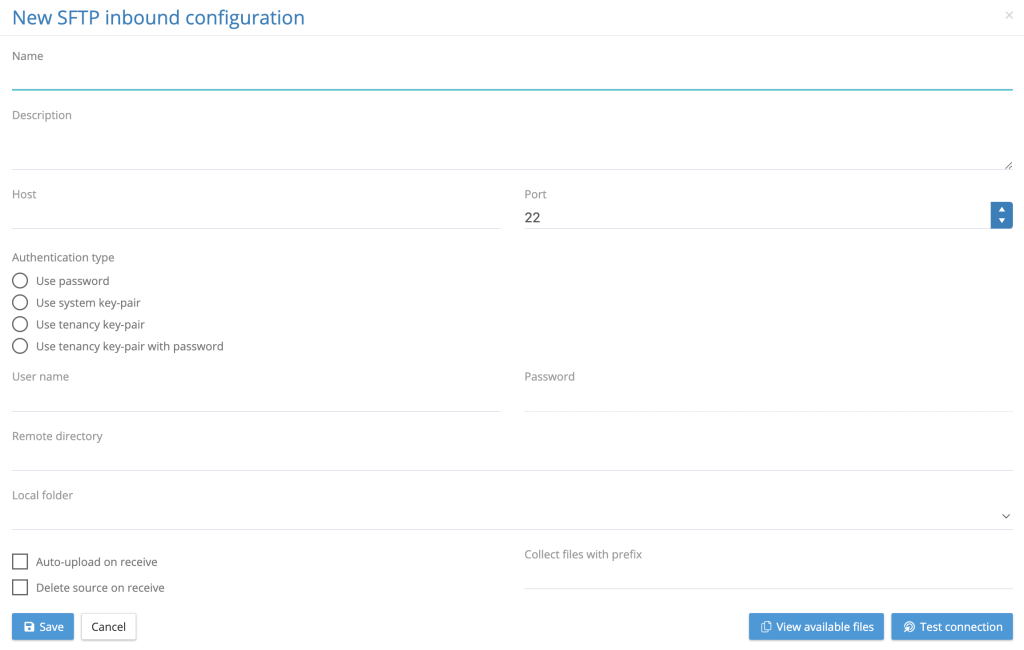
A tenancy administrator with the sFTP permissions can set-up a new SFTP inbound configuration. The following describes the options and components required for an SFTP connection.
- Name: Give the configuration a unique name
- Description (optional): Further information on the purpose of the SFTP connection.
- Host: The IP address of the SFTP server
- Port: Default setting is 22 this can be changed to an alternative port
- Authentication type:
- Use password:
- Use system key pair:
- Use tenancy key pair:
- Use tenancy key pair with password:
- User Name:
- Password:
- Remote Directory:
- Local Folder:
- Auto-upload on receive:
- Delete source on receive:
- Collect files with prefix:
- View available files:
- Test Configuration:
sFTP Receive
From the main menu sFTP Receive. This will list the available inbound sFTP configurations set-up for that tenancy, each with two action buttons view files and receive files.

Click on view files… to see the files residing on the sFTP server, click on receive files to transfer files to the tenancy auto-upload folder. Depending on the SFTP configuration, the files will automatically upload or they will reside in the auto-upload folder ready submission.
GL Journal Code Override
When assigning GL Codes to pay elements, override debit and credit codes can be assigned to specific pay elements. The override codes will be applied to the pay element based on organisation unit filtering set in the GL Journal Report.
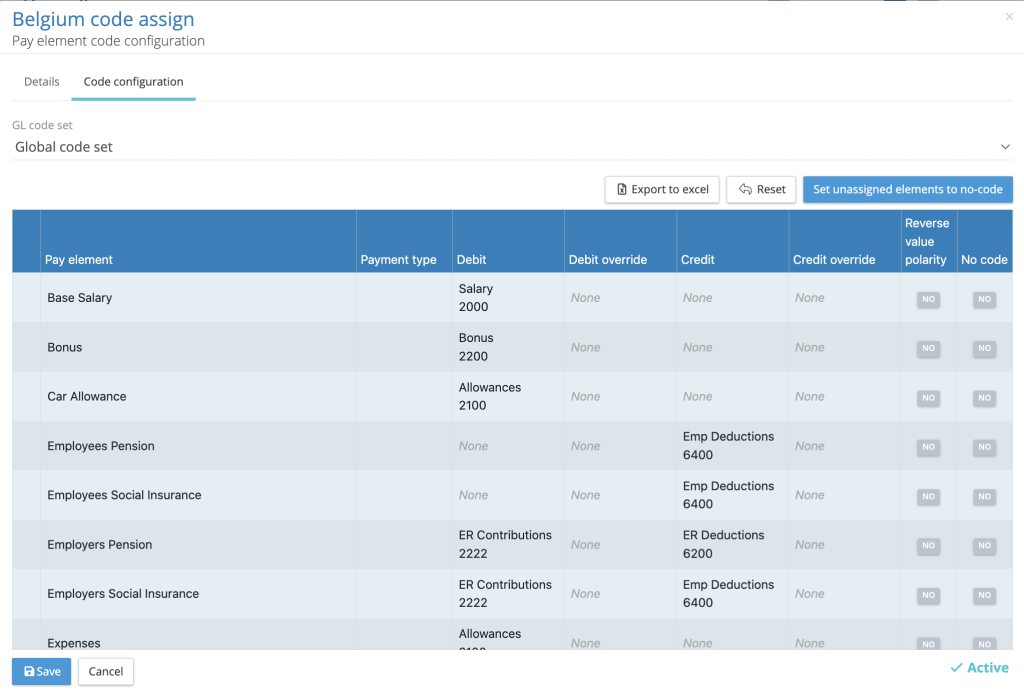
For each pay element in the pay element code assignment configuration is the option to select a debit or credit override.
When configuring a GL Journal report, on the organisation units tab, there is a function button next to each organisation unit in a column called Overriding org unit values.
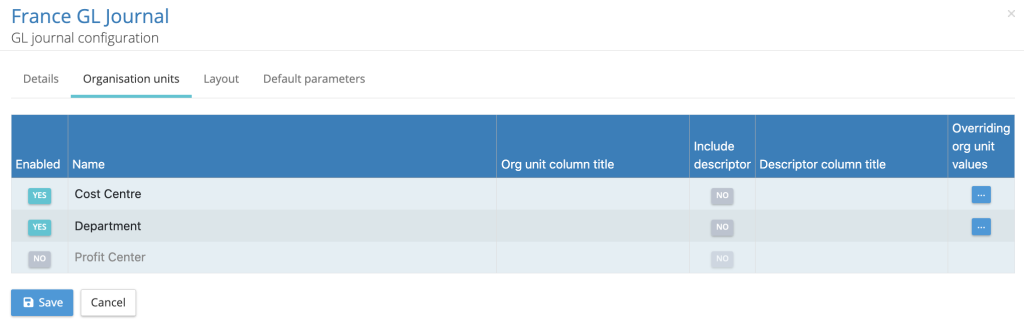
Click on the function button, to select those organisation unit values where a GL code override is required.
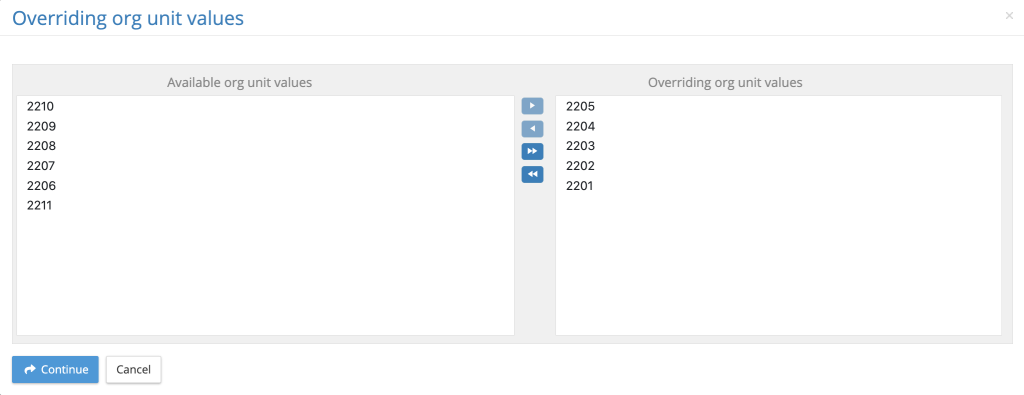
When the GL Journal report is generated, the system will compare the organisation unit value assigned to the employee with those assigned to the overriding org unit values. If the employee’s value matches, it will apply the override codes set up in the pay element code assignment. Where a pay element does not have an override code it will take the default code.
If more than one organisation unit has overriding org unit values have been set, it is an OR function so if either sets of overriding values occur the override codes will be assigned.
My recent reports
IPPEX has enhanced the functionality my recent reports functionality, click on the user account (top right) and it will present the following menu:
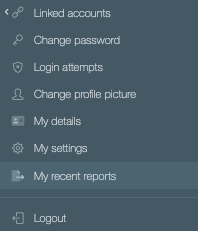
Click on My recent reports

There are three options:
Download report: This will download to your local system the report
Navigate to report: This will take you to the report folder in My Files, giving access to the report and results file.
Navigate to SFTP copy: If the report is also copied to an SFTP folder, this will open the FILES system for the payroll, pay period and SFTP folder.