Auto Upload
Auto-upload
IPPEX is continuously looking at ways to improve the productivity, the data upload function provides a facility to bulk upload data files for a payroll and pay period. This is ideally suited to organisations generating changes data in a consistent format from HR systems or the completion of templates. Similarly, this enhances the upload of gross to net data from a local payroll system.
For each payroll and pay period, there is a new folder added to the file system called auto-uploads, which has four sub-folders:
- Combined upload – For the upload employee record, address, bank, employee details, organisation units, pre-processing period and permanent pay elements.
- Pre-proc uploads – for the upload of employee details, organisation units, pre-processing period and permanent pay elements
- Post-proc uploads – for the upload of post processing pay elements, employee details, organsiation units and payments
- Time/unit uploads – for the upload of time/unit data
The auto-upload mechanism relies on the following components being present:
- Upload Identifier – The upload file requires a column which contains an upload identifier. For each data line in the upload file an encrypted key is required which is specific to the payroll and/or upload type.
- Pre-mapped – The upload file headings has to be mapped in the usual way through an upload via the control panel, including the payroll identifier column.
- Unlocked – The appropriate pre-processing or post-processing period must be unlocked to allow for the data to be uploaded.
Upload Identifier
The tenancy administrator has access to a set of payroll identifiers which are essential to perform the auto-upload function. ,Under administration > settings > upload identifiers is a page containing all of the identifiers for each payroll and upload type.

The objective of the upload identifier is to prevent the upload of erroneous files and to ensure data is loaded to the appropriate payroll. There is a Payroll Identifier, this can be used for all upload types, this ensures data is being uploaded to the right payroll, however this will not prevent a user from loading a file to the wrong upload type. Alternatively, there are upload identifiers for each upload type for a payroll, this presents a greater level of control to the upload process.
NOTE: The combined auto-upload will automatically create new employee records, if the file contains a new employee number. If the wrong file had been presented to a payroll, if the upload identifier does not match that payroll, the system will fail each data row, preventing the mass creation of new employees.
Our recommendation is to utilise the upload type specific IDs.
Against each upload identifier is a copy button, this function works for Chrome and Safari, some browsers such as IE it does not copy the value to the clipboard. Alternatively using the export to excel button, all of the identifiers can be downloaded in an Excel file.
The column name in the upload file for the identifier can be called anything and can be positioned anywhere in the upload file, it has to be mapped in the Upload identifier for the given upload type
The upload identifier is only required for the auto-upload mechanism, all existing uploads through the control panel continue as normal.
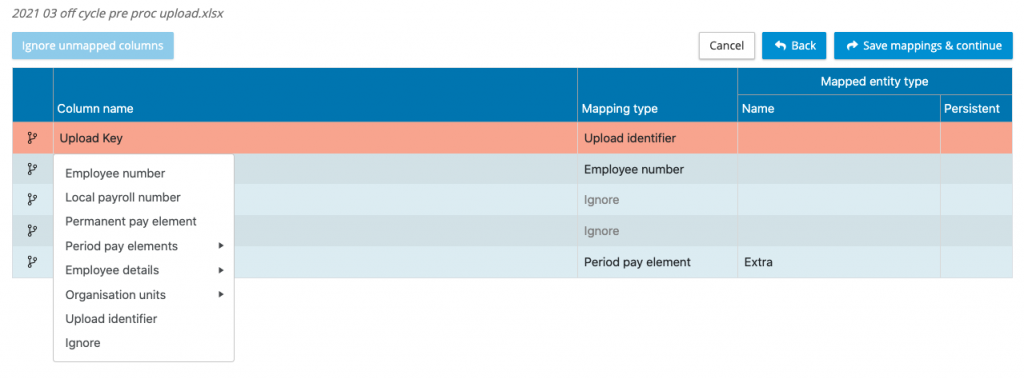
In the example shown above, the column heading upload key is mapped to the upload identifier.
Data upload folders
Within FILES each payroll and pay period (including supplementary periods) have a set of folders to initiate the auto-upload of data files.
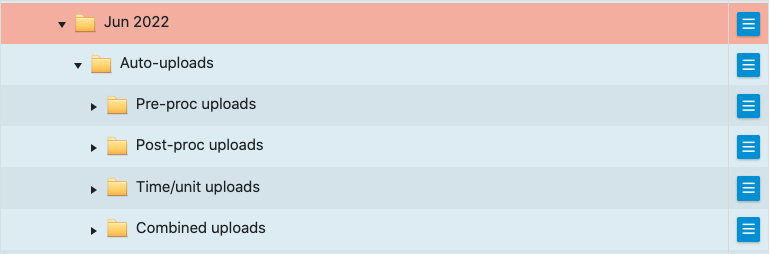
Expand the Auto-uploads and it will reveal four sub-folders; pre-proc uploads, post-proc uploads, time/unit uploads and combined uploads. Using the action button next to the sub-folder upload the files required for that upload type and pay period. Some organisations may only have one file for the pay period others could have multiple.
When all of the files have been uploaded to a folder, they are ready to be submitted for upload to the payroll and pay period. There is a choice to upload files individually or a whole folder of files can be submitted.
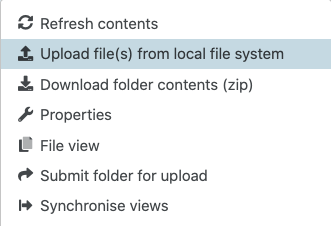
Auto-upload a file – Expand the upload folder to show all of the files, using the action button next to the file that requires uploading, click on submit file for upload. The system presents an Are you sure? Warning, click on yes to proceed.
Auto-upload a folder – using the action button next to the folder that requires all of the files uploading, click on submit folder for upload. The system presents an Are you sure? Warning, click on yes to proceed.
The system will place the file in the upload queue, removing it from the upload folder and it will appear in the uploaded folder for that upload type.
When performing a folder upload, it will place each one of the files in a queue in the upload server, order in which they are uploaded will be determined by the system. IMPORTANT: If you have multiple files containing employee record updates, for example a new hire file, leavers file and master data file, it is important to upload the new hires first before uploading pre-processing or post processing data.
Auto-upload Error Handling
The first thing the system will do is to check if the pay period is unlocked for the upload type. If it is not, the following message will be shown:
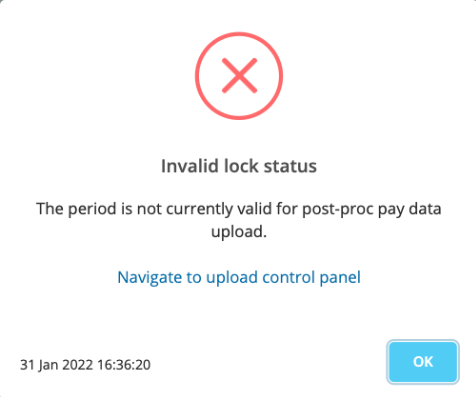
The message provides a link to navigate to the control panel. The file will remain in the upload folder if the period is locked for upload.
When the file has been sent for upload, there are a number of scenarios which could cause the upload to abort or to partially commit the data.
- No mapping for one or several column headings – The system will abort the upload if one or more column headings are unmapped.
- No upload identifier column heading – The system will abort the upload if the file does not have a column mapped to the upload identifier.
- Missing or incorrect upload identifiers – If data line in the upload file is missing or has an incorrect upload identifier, that data row will be excluded from the upload process.
The results file generated from the upload process will provide the details of any failures or errors.